Quick Start Guide for VegeSprinkler
Before You Start
Warning: DO NOT CONNECT GND to the COMMON line. GND and common are not the same lines, and connecting them will destroy the unit.
Warning: Because batteries off-gas acid, especially in hot sealed environments, never place batteries inside the VegeSprinkler enclosure, as this will corrode and destroy the electronics, over time, and void any warranties.
Connect the Hub to a network before you add sensors to it.
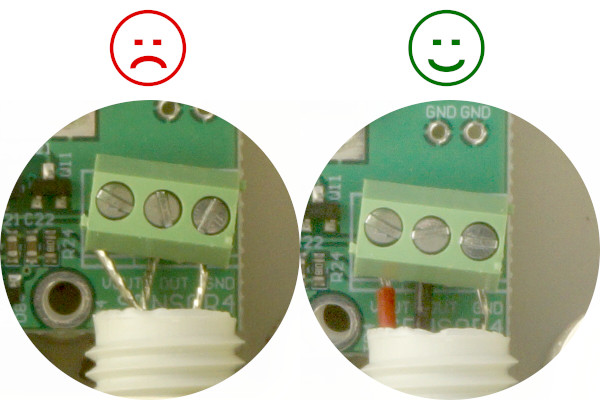
Make sure you trim any wires going to the terminal blocks, so that they are fully covered with insulation, as shown in the diagram below. If you don't trim the wires, they could short together if the wire is twisted at all.
Captive Portals
Many larger institutions such as universities use captival portal signs-ins to the internet. You can tell if it's capitive portal, if you are required to use a sign-in page before accessing the wifi network. If you are connecting your VegeHub a captive portal network, see our VegeHub Trouble Shooting Guide.
Configure the VegeSprinkler to connect to your local WiFi network
The first step is to configure the VegeSprinkler for access to your local WiFi network.

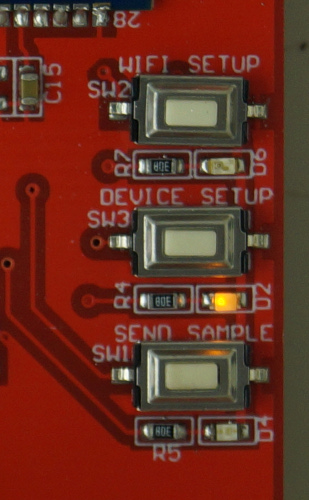
- Hold down the "WiFi Setup" button until its red LED turns on.
- The VegeSprinkler has now created its own WiFi hot spot. Use a phone or laptop to connect to the new WiFi network. It will be named something similar to VEGE_HUB_E4_9B.
- Your phone or laptop may now ask you to log in to the network, this may bring you to the WiFi setup page for the VegeSprinkler. If you are not asked to log in, open a web browser and type in to the address bar : 192.168.1.1.
- After the WiFi setup page appears, click the Refresh button to bring up a list of nearby
WiFi networks.
From the list, click your network. This will automatically fill in your network's name.
Now go to the "pass phrase" field and fill in your network's password, then click Connect. The response web page will be an error page, because the hub immediately disconnects from the network. Your phone or laptop should now automatically disconnect from the hub.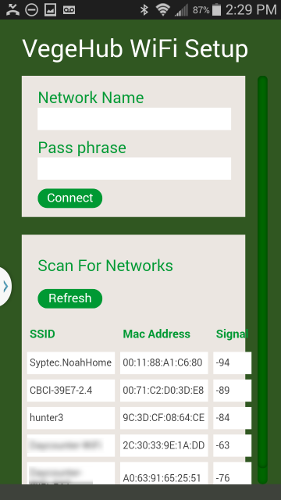
- The VegeSprinkler will now try to connect to your WiFi network. If the red LED is still lit, press the WIFI setup button again, until it turns off.
Determine the IP address of your VegeSprinkler.
Now that your VegeSprinkler has connected to your network. You can configure it and direct it to connect to a remote server of your choice. To do this you will need to determine the IP address that your router has assigned to your hub.
You will need to insert a USB thumb drive into the Hub's micro USB slot. If your USB drive doesn't have the right connector, you will need to use a micro USB adapter. Please note that the drive must be formatted with FAT16 or FAT32. Some newer larger thumb drives use FATeX, which will NOT work with the hub.
LEAVE THE DRIVE IN FOR AT LEAST 10 SECONDS!
The Hub will write a file called "ipaddress.txt" to the root folder of your thumb drive. Insert the drive into your computer, and open this file with a text editor, or just click on it. You will see something like the following:
Device IP address: 192.168.0.41
If you see the file, but it is empty, that means that you've pulled out the drive too quickly. To resolve this, insert the drive, again waiting 10 seconds before pulling it out. You may have to repeat this process twice.
Now that you have your IP address. You can configure your hub in any web browser.
If you don't happen to have a USB thumb drive, you can use a phone application like Fing to scan your network and find the assigned IP address for your hub. This is more complicated so we recommend using the thumb drive method instead. Click here to see this method.
Configure the VegeSprinkler
In this step you will configure the hub through it's web page interface. It is critical for this step that the yellow LED is lit indicating that the hub is awake and ready to be configured. The hub is sleeping most of the time, so press the "Device Setup" button, such that the yellow LED turns on, and stays on. If the yellow LED turns off it means that the hub has gone to sleep, and you will not be able to access its configuration page. Inserting the USB drive or its adapter will also wake the device and turn on its yellow LED.
Once the yellow LED is turned on, type your hub's IP address into the address bar of your Chrome web browser on a computer or phone connected to your local WiFi network. This will bring up the home page of setup webpage for the VegeSprinkler.
VegeSprinkler Home Tab
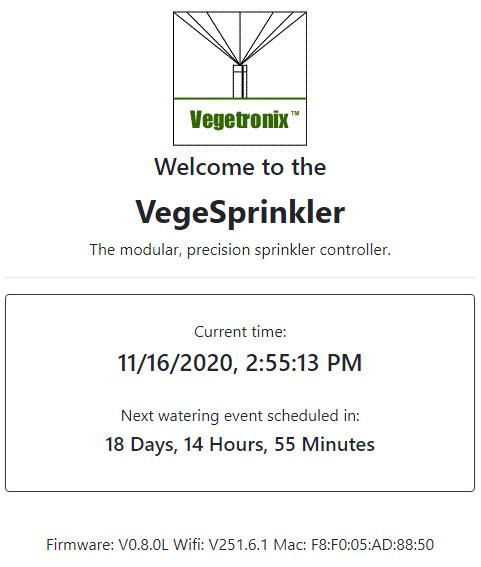
The "Home" tab shows the current date and time, and firmware version and WIFI software versions. It also shows when the next watering event will take place, and the water savings.
To change the local time, click on the Settings Tab.
VegeSprinkler Programs Tab
Using this tab you may create up to 4 programs. A program will control up to 4 valves with a particular schedule. The valves will run consecutively for a specified duration after the start time has been reached.

Click on the "Programs" tab to view and set the following settings:
- Program Enabled - When this checkbox is checked, the program will run, otherwise, the program is disabled.
- Program Name - You can enter a unique name for each program.
- Start Time - Enter the time when you want the program to start.
- Send Hub Voltage - For applications when the VegeSprinkler is powered by battery, this allows the battery voltage to be sampled and sent to the server along with the samples from the sensor. This allows you to remotely monitor the battery on the VegeSprinkler, and be alerted when it needs to be changed.
- Sensor Power This allows you to apply constant power to the sensor. For battery applications this should only be used for very low current sensors, such as our Vegetronix VG-DARK sensor. This option is also useful when you are setting up sensors such as the AquaPlumb, which need power to be calibrated.
- Selected Days/Run Every - There are two options for the periodicity of the program. The program can run weekly on selected days, or it can run with a fixed period, for example every 10 minutes, or every 2 days. If you select it to run every 10 minutes, it will start running at the start time, and then run every 10 minutes for ever. If you set it to run every 2 days, every second day it will start at the specified start time, and run the program.
- Valves - Each valve can be individually enabled or disabled with the checkbox, and its run duration set.
VegeSprinkler Control Tab
With the control tab the you can manually control your sprinklers and get feedback.

- Start Program - Select one of the programs, and it will immediately start.
- Valve Control - An of the valves can individually be controlled with their corresponding button.
- Current Feedback - For the 24VAC valve controller, when a valve is turned, it's current usage will be displayed. This is useful for troubleshooting defective wiring or valves. The latching valve controller doesn't have this capability.
- Refresh - This will refresh the page, and update any feedback such as valve currents.
- Update - This will direct the controller to contact VegeCloud and update it's settings.
VegeSprinkler Settings Tab
The settings tab allows you to setup Vegecloud Server Settings, the time zone, and any valve conditional settings.
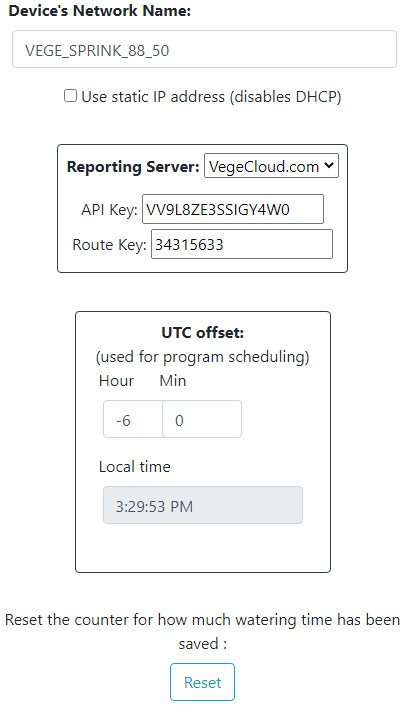
- Device Network Name - This is the name that will appear on your network. You'll see this name if you do a network scan, or look at the device table in your router.
- Static IP - This is and advanced feature and not normally used. Normally people use DHCP and dynamically assign an IP address.
- Reporting Server - Normally VegeCloud.com is your reporting server, unless you've implemented your own server. Log into your account at vegecloud.com and get your API key and Route key, and fill in the values here.
- UTC Offset - This allows you to set your time zone. If you don't know the UTC of your time zone, just iteratively change the hours, until the displayed time matches your local time.
- Local Time - This displays the local time. It is a read-only field. To change the time modify the UTC Offset field above. This time will be stored in the default time format of your browser, namely, 12 hour or 24 hour time.
- Reset Counter Button - The amount of water savings express in time is displayed on the home page. You can reset this back to zero with this button.
Valve Settings
This section allows you to conditionally water based on sensor that are connected to VegeCloud.com, or other internet based sensors.
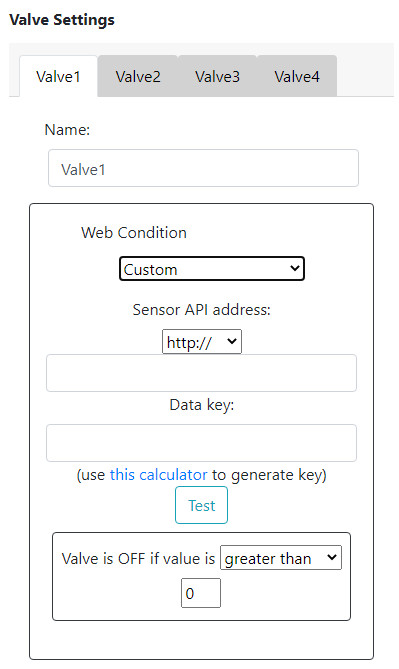
- Valve Name - Enter the name of the valve. For example: "Rose Garden"
- Web Condition: VegeCloud
-
Most people will choose this option. This option creates a vegecloud web conditional link. Log into VegeCloud.com, and then click on the link. This will bring up a web conditional page in VegeCloud.com that you can edit. You can select a sensor, range and time.
When the valve is schedule to turn on, it's web conditional will first be checked. The VegeSprinkler will log into VegeCloud and check the last updated value of the specified sensor. If the sensor's value is true, it will allow the valve to turn on otherwise, the valve will be blocked.
In the case that the server can not be contacted, the web conditional is assumed to be true, and the valve will turn on.
-
- Web Condition: Custom This option is for advanced user,
that are not using vegecloud connected sensors.
(Though, since this is a general interface, you can use this also
for vegecloud connected sensors. )
- Sensor API address: This is a URL to your sensor's API. For example, in the case of a VegeCloud connected sensor the URL might look like: https://api.vegecloud.com/webcondition/34315633/C60GNT46FEXXXXX
- Data Key - The URL you entered above must return a JSON object. This object may have multiple elements, and so you need to specify which element you want to use as the sensor data. We've provided a calculator to create help you determine this value: Data Key Calculator.
- Condition - You can specify the threshold vales of whether to turn on the valve or not with the condition values.
When the valve is schedule to turn on, it's web conditional will first be checked. The VegeSprinkler will connect to the specified URL and check the last updated value of the specified sensor. If the sensor's value is true, it will allow the valve to turn on otherwise, the valve will be blocked.
In the case that the server specified by the URL can not be contacted, the web conditional is assumed to be true, and the valve will turn on.
Trouble Shooting
See our VegeSprinkler Trouble Shooting Guide for any difficulties setting up your hub.
See our VegeHub Diagnostic LEDs to decode the meaning of the various LED indicators.