Quick Start Guide - VegeHub
If you have an earlier hub with software version 1.61 or lower see this guide: Quick Start Older Versions
Before You Start
Warning: Because batteries off-gas acid, especially in hot sealed environments, never place batteries inside the VegeHub enclosure, as this will corrode and destroy the electronics, over time, and void any warranties.
Connect the Hub to a network before you add sensors to it.
Make sure you trim any wires going to the terminal blocks, so that they are fully covered with insulation, as shown in the diagram below. If you don't trim the wires, they could short together if the wire is twisted at all.
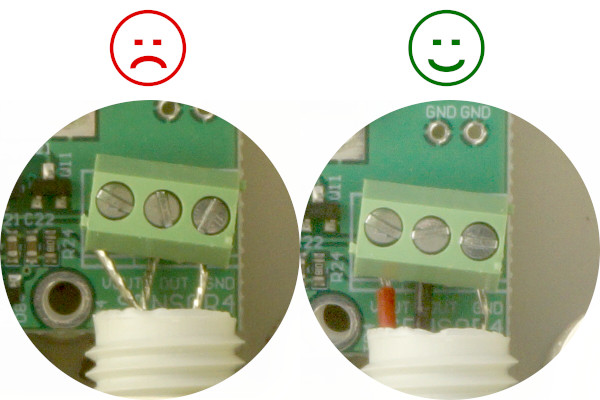
It can be difficult inserting the wires directly from the terminal blocks into the glands. An easier approach is to remove the three T9-Torx screws that mount the board into the inclosure, lifting the board, and then inserting the wires. A regular hex (allen key) driver can be used to remove the screws, as well.
Captive Portals
Many larger institutions such as universities use captival portal signs-ins to the internet. You can tell if it's capitive portal, if you are required to use a sign-in page before accessing the wifi network. If you are connecting your VegeHub a captive portal network, see our VegeHub Trouble Shooting Guide.
Video Quick Start Guide
The following video will guide you through the VegeHub configuration process, and show you how to connect it to the cloud server site - VegeCloud.com. The text below this video goes through the same information in greater detail.
Connect your VegeHub to VegeCloud in only 5 Min.
Configure the VegeHub to connect to your local WiFi network
The first step is to configure the VegeHub for access to your local WiFi network.
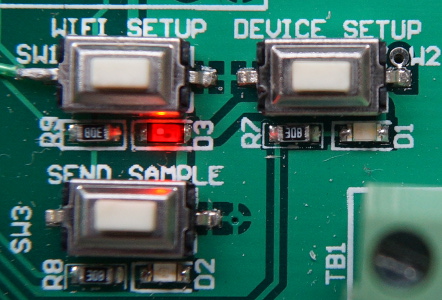
- Hold down the "WiFi Setup" button until its red LED turns on.
- The VegeHub has now created its own WiFi hotspot. Use a phone or laptop to connect to the new WiFi network. It will be named something similar to VEGE_HUB_E4_9B.
- Your phone or laptop may now ask you to log in to the network, this may bring you to the WiFi setup page for the VegeHub. If you are not asked to log in, open a web browser and type in to the address bar : 192.168.1.1.
- After the WiFi setup page appears, click the Refresh button to bring up a list of nearby
WiFi networks.
From the list, click your network. This will automatically fill in your network's name.
Now go to the "pass phrase" field and fill in your network's password, then click Connect. The response web page will be an error page, because the hub immediately disconnects from the network. Your phone or laptop should now automatically disconnect from the hub.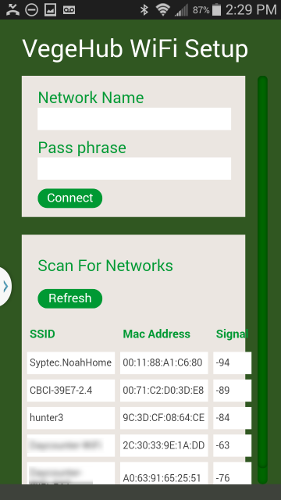
- The VegeHub will now try to connect to your WiFi network. If the red LED is still lit, press the WIFI setup button again, until it turns off.
Determine the IP address of your VegeHub.
Now that your VegeHub has connected to your network. You can configure it and direct it to connect to a remote server of your choice. To do this you will need to determine the IP address that your router has assigned to your hub.
You will need to insert a USB thumb drive into the Hub's micro USB slot. If your USB drive doesn't have the right connector, you will need to use a micro USB adapter. Please note that the drive must be formatted with FAT16 or FAT32. Some newer larger thumb drives use FATeX, which will NOT work with the hub.
LEAVE THE DRIVE IN FOR AT LEAST 10 SECONDS!
The Hub will write a file called "ipaddress.txt" to the root folder of your thumb drive. Insert the drive into your computer, and open this file with a text editor, or just click on it. You will see something like the following:
Device IP address: 192.168.0.41
If you see the file, but it is empty, that means that you've pulled out the drive too quickly. To resolve this, insert the drive, again waiting 10 seconds before pulling it out. You may have to repeat this process twice.
Now that you have your IP address. You can configure your hub in any web browser.
If you don't happen to have a USB thumb drive, you can use a phone application like Fing to scan your network and find the assigned IP address for your hub. This is more complicated so we recommend using the thumb drive method instead. Click here to see this method.
Configure the VegeHub
In this step you will configure the hub through it's web page interface. It is critical for this step that the yellow LED is lit indicating that the hub is awake and ready to be configured. The hub is sleeping most of the time, so press the "Device Setup" button, such that the yellow LED turns on, and stays on. If the yellow LED turns off it means that the hub has gone to sleep, and you will not be able to access its configuration page. Inserting the USB drive or its adapter will also wake the device and turn on its yellow LED.
Once the yellow LED is turned on, type your hub's IP address into the address bar of your Chrome web browser on a computer or phone connected to your local WiFi network. This will bring up the home page of setup webpage for the VegeHub.
Please note that Version 3.0 has a bug in that it does not work with Apple's Safari browser. We will have a fix for this bug in the next firmware version that will be released by Sept 2020. Until then, please use Chrome or Firefox, when configuring the hub.
VegeHub Home Tab
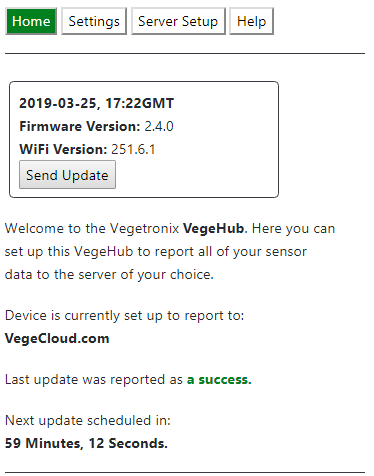
The "Home tab shows the current date and time, and firmware version and WIFI software versions, and lets you know to which server you are currently sending data.
The "Send Update" button allows you to immediately read a sensor and send the sample to the server that you will select in a subsequent step.
VegeHub Settings Tab
Click on the "Settings" tab to view and set the following settings:
- Unique Name - You can enter a unique name for the VegeHub. Other devices on the network such as your router will display this name to reference your VegeHub. Leaving it as the default value is recommended.
- Blink Led - When this box is checked, the green LED will blink once each time the hub connects to the server. Setting this option will reduce battery life slightly, but it is useful for troubleshooting.
- Send Hub Voltage - For applications when the VegeHub is powered by battery, this allows the battery voltage to be sampled and sent to the server along with the samples from the sensor. This allows you to remotely monitor the battery on the VegeHub, and be alerted when it needs to be changed.
- Sensor Power This allows you to apply constant power to the sensor. For battery applications this should only be used for very low current sensors, such as our Vegetronix VG-DARK sensor. This option is also useful when you are setting up sensors such as the AquaPlumb, which need power to be calibrated.
- Reporting Style - There are two reporting styles:
- Sample Mode This mode allows the VegeHub to periodically wake from sleep,
and read the sensor, and send these samples to your selected server after each
sample
is taken, or in batches to conserve battery life. Most analog sensors will use
this mode.
The following Sample Mode Options are available: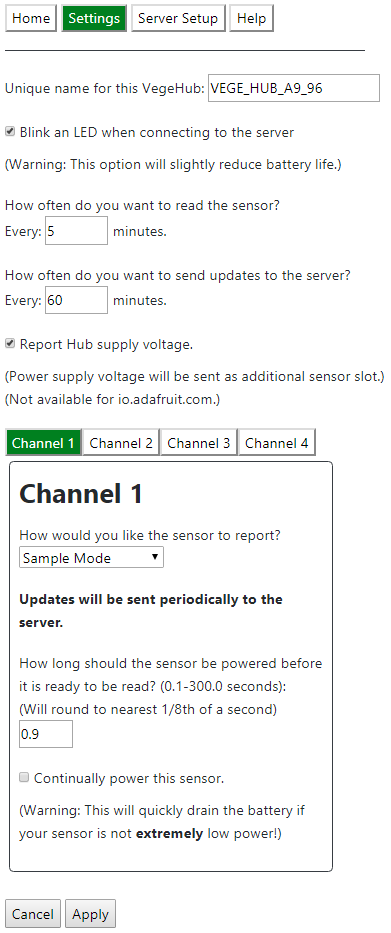
- Sample Period This specifies how often do you want to read the sensor. This setting will affect your battery life, and so you want to use the largest value possible to reduce battery consumption. Many sensors such as moisture sensors only need to be read about once per hour. If you want to read the sensor every hour, the enter 60 for this value. For inital setup and trouble shooting you may want to set this for rapid updates, then after it is working set it to a slower value, to conserve power.
- Update Period This specifies how often the VegeHub connects to your selected server to post data. If this value is the same as the sample period, then it will connect to the server each time it reads a sample of data from a sensor. If this is set to a value larger than the sample period, then it will batch post multiple samples when updating. It is best to set this to a multiple of the sample period value. This also affects battery life. The larger the period, the lower the battery usage. For inital setup and trouble shooting you may want to set this for rapid updates, then after it is working set it to a slower value, to conserve power.
- Warmup Time This specifies the warm up time of the sensor before a reading is taken. Power is normally applied to the sensor only right before a sample is taken, to reduce battery power, however, most sensors need time to power up before they are fully functional. This field specified how long to wait after apply power, before taking a sensor reading. Check your sensor's specification to determine this value. Typical values are 1 second. If the checkbox for the sensor power is set to always on, then this field is ignored.
- Edge Trigger Mode This is a binary mode that allows the VegeHub to be
waken up from
sleep when a sensor has gone from 3V to 0V, or 0V to 3V, and for it to send
notification
to a server.
Use this mode for push buttons, or switches, or other contact closure type
sensors, that are either
on or off. Since the VegeHub only wakes up when a trigger occurs this greatly
increases
battery life.
The following Edge Trigger Mode Options are available: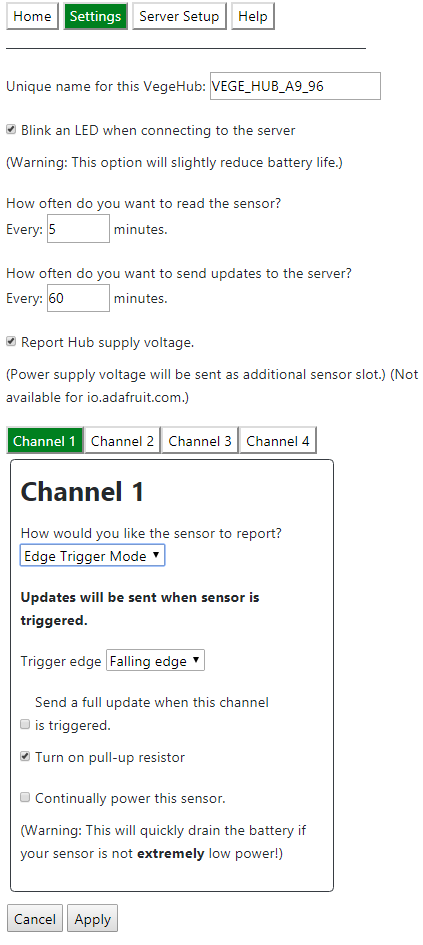
- Trigger Edge Falling means that the sensor's output goes from about 3V voltage to 0V, and raising means that the sensor's output goes from 0V to about 3V.
- Pull-up Resistor Checking this will enable an internal pull up resistor. This would typically be used with a push button, switch or contact closure sensor.
- Sample Mode This mode allows the VegeHub to periodically wake from sleep,
and read the sensor, and send these samples to your selected server after each
sample
is taken, or in batches to conserve battery life. Most analog sensors will use
this mode.
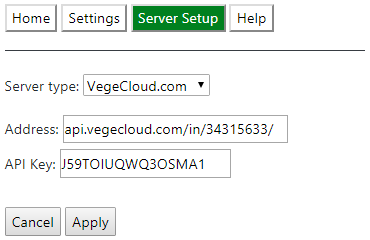
VegeHub Server Setup Tab
The server setup tab allows you to connect with 3 popular IoT sites: ThingSpeak.com, io.Adafruit.com, and VegeCloud.com. VegeCloud is a new site, and is in Beta testing. You can also enter in any other server URL, but it must support VegeCloud formated data.
Trouble Shooting
See our VegeHub Trouble Shooting Guide for any difficulties setting up your hub.
See our VegeHub Diagnostic LEDs to decode the meaning of the various LED indicators.