Connecting to VegeHub USB Port
USB Driver
Most new operating systems will recognize the VegHub when you plug it into the USB port, and so for most cases you will not need to install a driver. In the case that your computer does not identify the VegeHub when plugged in, continue following these steps:
- Download the driver VegeHubCdC-Driver.zip and extract to a directory.
- Open Windows Device Manager. This can usually be found in the start menu, or the control panel, but you may need to look up how to access it on your version of windows.
- The Device Manager will have to be run as an administrator so that drivers can be modified. If you are not already logged in as an administrator, before you launch the Device Manager, right click on it and select "Run as administrator", then you may need to provide a password.
- In the section that says "Other Devices" right click on the device called VegeHub with a warning symbol on it, and select "Update Driver Software..."
- Select the option: "Browse my computer for driver software"
- Browse to the folder that contains the USB driver, and select "Next". Windows will install the driver.
- You will now see a device called: "Communication Device Class ASF Example (COMx). Make a note of the comm port number,as you will need this later.
Determining the VegeHub's Comm Port
When you plug in a USB comm port Device, Windows randomly assigns it a number. To access your device you will need to ascertain which comm port it has been assigned.
To do this, open the Windows Device Manager. This can usually be found in the start menu, or the control panel, but you may need to look up how to access it on your version of windows.
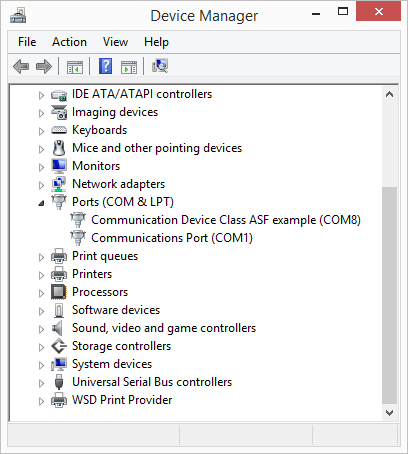
The Comm ports can be found in the device tree under Port (Comm & LPT). The hub will be displayed as "Communication Device Class ASF example (COMx)".
Terminal
NOTE: You can only access the hub as a COM Port through a terminal for VegeHub Firmware versions 1.61 and below. Starting with version 1.7 ( as of Jan 28,2019), the COM Port functionality was dropped in favor of writing the IP address to a USB stick, which is much easier.
In order to use the USB interface of the VegeHub you will need to use a serial terminal program. There are many available. For example: Termite.
The terminal program should be set up with the following settings:
- Baud rate: 115200
- Data bits: 8
- Stop bits: 1
- Parity: None
- Flow control: DTR/DSR
- Append CR: true
- Local echo: true
USB Terminal Interface
To check to see if the terminal is communication with the VegeHub by typing h into the terminal and press the enter key. This should return the help display from the VegeHub.
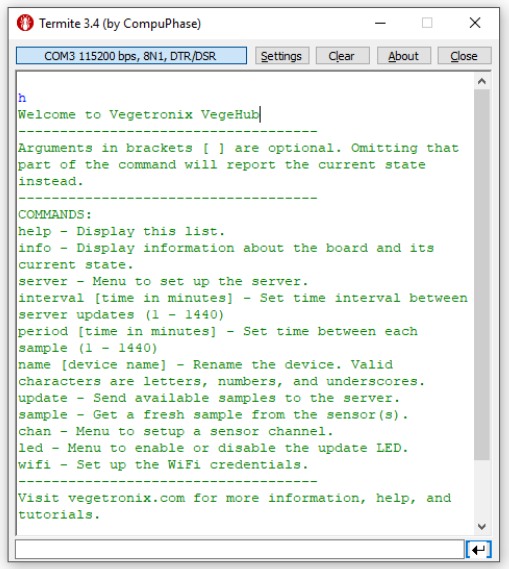
The following commands are available from the terminal interface:
- help - This will display a list of all the commands that are available for you to use.
- info - Display information about the board and its current state.
- server - This will give you a menu to set up the server. It will walk you through connecting your VegeHub to your server.
- interval [time in minutes] - This will set the interval length (in minutes) betweean each update being sent to the cloud server. To set it just type "interval " and the number you want to use. For example: "interval 60" would set server updates to happen every 30 minutes. It can be between 1 and 1440 minutes. If you just type "interval" with no number after it, it will tell you the current value.
- period [time in minutes] - This will set the period (in minutes) between taking samples from the sensor(s). These samples will be stored until a server update happens. To set it, type "period " and the number of minutes you want between samples. For example: "period 10" would take a sample from the sensor(s) every ten minutes and store it until the next server update. It can be between 1 and 1440 minutes. If you just type "period" it will tell you the current value.
- name [device name] - Set the name of this VegeHub. This is the name that will be used as the hostname for this device on the network. It should not be the same as any other device on the network. To set the name just type name and then the name you want to use. For example: name tomato_plants will rename your device tomato_plants. Valid characters are letters, numbers, and underscores (no spaces). If you just type "name" it will tell you the current value.
- update - This will send an update to the server with all the stored samples. If there are no stored samples it will try to take a new one and send that.
- sample - This tells the VegeHub to take a new sample from the sensor(s) and store it for the next update.
- chan - This will give you a menu to walk you through setting up a sensor channel. Answer the questions to set up the channel in the configuration you need.
- led - This will give you a menu to walk you through enabling and disabling the LEDs on the device.
- wifi - This will give you a menu to walk you through setting up the WiFi connection. It will allow you to scan available networks, choose which to use, and enter the login information for your network.